Everyone who renovates tells you to start with the paint color. Pick a Benjamin Moore swatch, tape it to the wall, live with it for a week. I did this. I followed the advice. And I wasted three weeks making a paint decision that I had to redo entirely once our light fixtures were in place. If you're renovating a historic home and you want to start with lighting, not paint, not flooring, not furniture. This post is the whole argument for why.
The rule I now give everyone who asks about our Charleston single house renovation: start with the lighting. Plan your electrical rough-in first. Choose your fixtures second. Then paint. Then everything else. This order will save you from decisions you'll regret and expenses you'll repeat.
Why Lighting Comes Before Everything Else in a Historic Home
In a newer home with standard 8-foot ceilings, you can get away with treating lighting as an afterthought. The scale is forgiving, the ceiling heights are predictable, and most fixtures are designed for exactly those conditions. But in a home built in 1892 with 10-foot ceilings in the main rooms and 11-foot ceilings in the parlor? The rules are different.
Our house, like most Charleston single houses of its era, was designed around natural light and ventilation. The tall windows, the high ceilings, the piazza running along the south side, all of it was meant to work with the light, not against it. Artificial lighting was added later, always somewhat awkwardly, almost always in the wrong places. When we bought the house, there was a single ceiling medallion in the center of the living room ceiling with a 1970s globe fixture that cast about 40 watts of flat, directionless light across a 17-by-22-foot room. It was genuinely one of the darkest inhabited spaces I'd ever stood in.
So the starting point for our renovation was never "what color should the walls be?" It was "how do we light this room properly?" and that question forced every other decision to follow from it.
The Electrical Rough-In: The Decision You Can't Undo
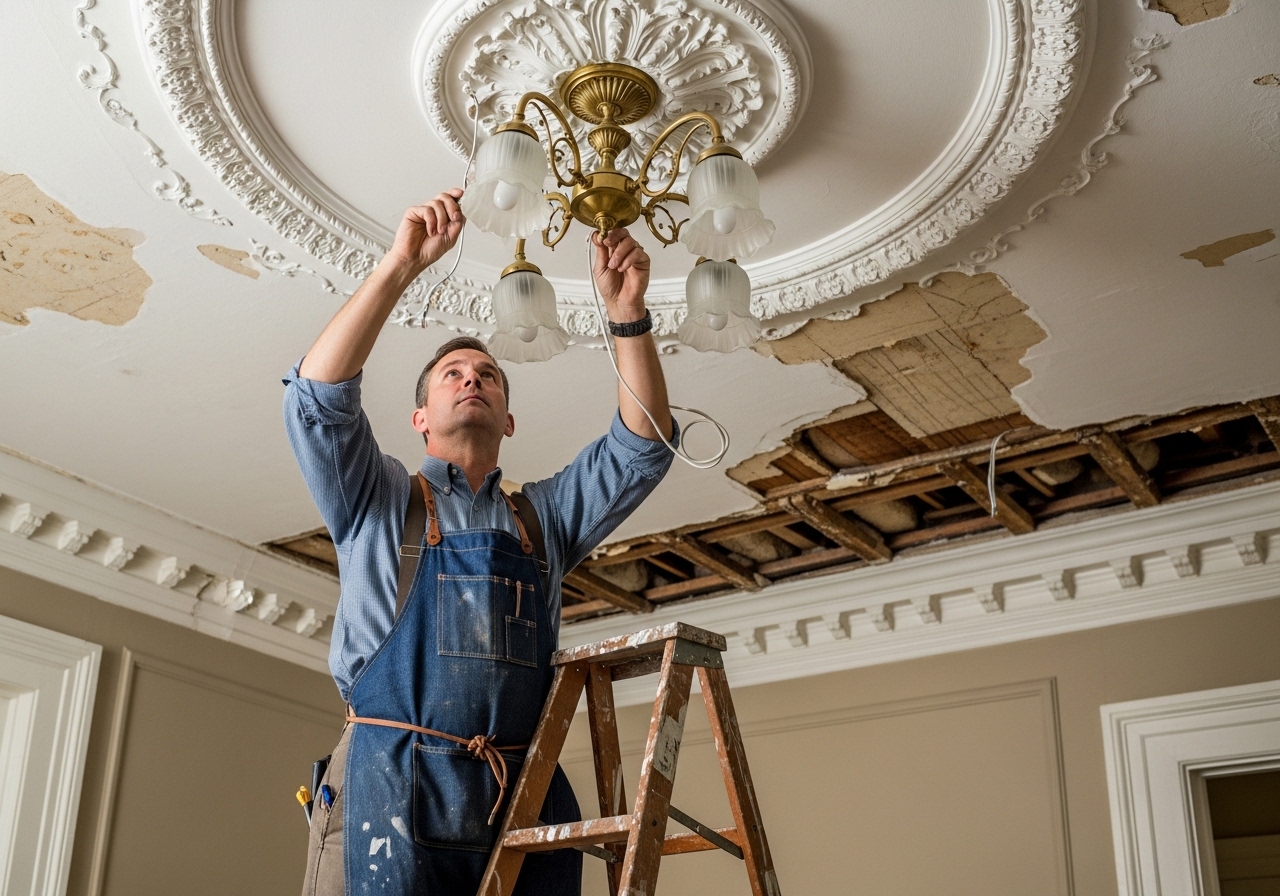
Before we opened any walls, before we touched a single surface, we sat down with our electrician, a man named Marcus who has worked in Charleston single houses for 30 years and knows more about knob-and-tube wiring than anyone should have to. And we talked through every room. Where did we want the fixtures? What kind of fixtures? What control zones? Where would the dimmers go?
This conversation took four hours and cost us nothing but time. The decisions we made in that four hours determined the physical location of every junction box, every switch, every dedicated circuit in the house. Getting this wrong would mean either living with bad lighting forever or opening the walls again. In a house with original plaster walls, not drywall. That means hiring a plaster restoration specialist at $85–$120 per hour to fix the damage. We were highly motivated to get it right the first time.
The things we decided in that planning session:
- The dining room would have a chandelier at the center, but hung lower than "standard". We ultimately landed at 30 inches from the tabletop, which I write about in detail in my guide to dining room chandelier height in a historic home.
- The living room would have no overhead fixture, instead, a dedicated circuit for floor lamps on a wall switch. So we could turn on three floor lamps simultaneously from the door. I write about this in my lamp placement guide.
- The hallway would get sconces instead of overhead lighting, which is period-appropriate and far more flattering. See my post on hallway sconce height and placement for the specifics.
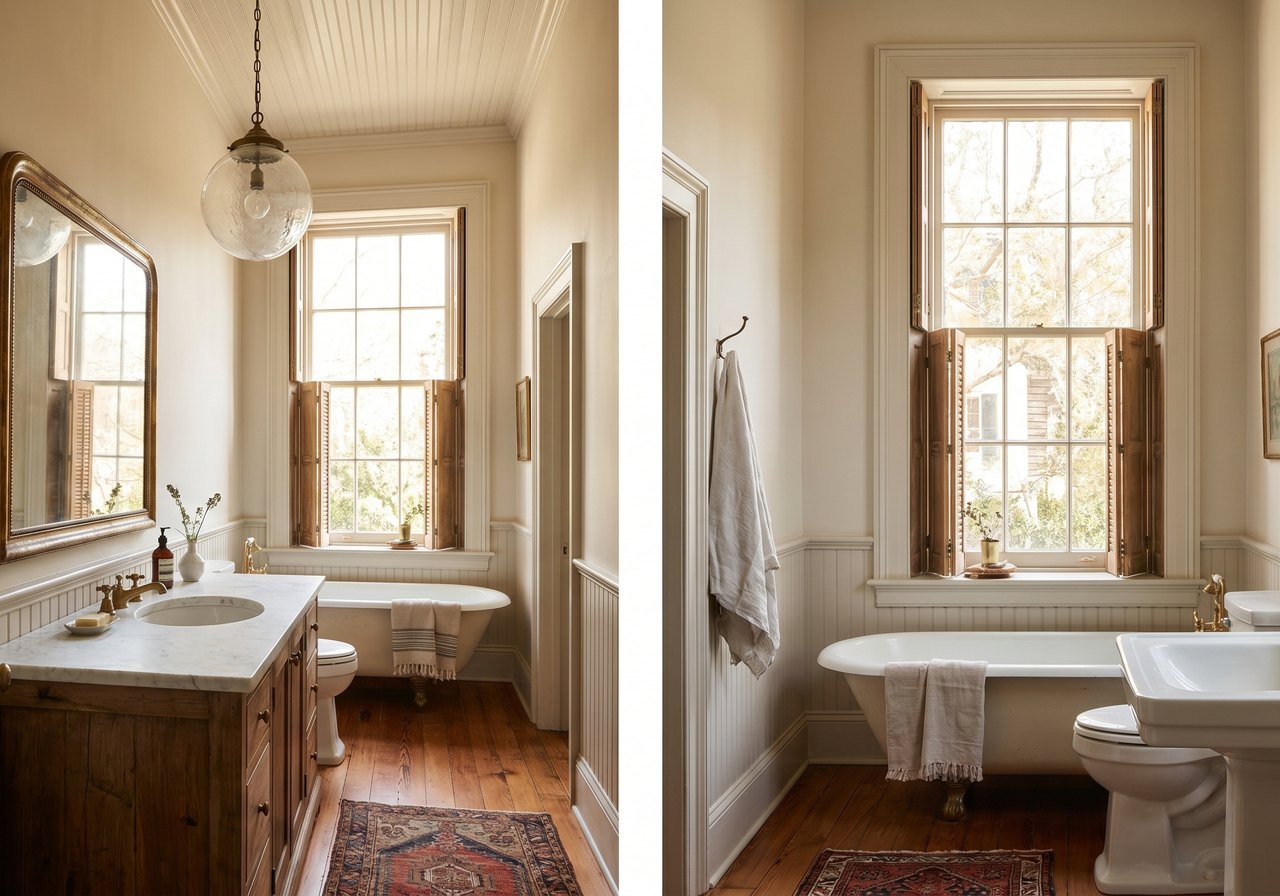
- Every important room would be on dimmers. Not just the dining room, every single room. This cost us about $400 more in dimmers and was worth every cent.
None of these decisions could have been made well after the walls were closed. They required the electrician on-site, looking at the rooms, understanding the ceiling heights. The planning session was the renovation.
The Fixture-First Rule: Why Your Paint Color Depends on Your Fixture
Here's the thing that most renovation guides skip over: paint colors look different depending on the color temperature of the light source illuminating them. A color that reads as a warm sage green under 2700K incandescent-equivalent LEDs will read as a gray-green under 4000K cool white LEDs. Not subtly different. Meaningfully different. Different enough that you might choose the wrong paint color if you're evaluating swatches in a room lit with temporary construction lighting.
We learned this in the living room. We had our paint swatches up. We'd narrowed it to three Benjamin Moore colors in the sage-to-deep-green range, because this is a Charleston single house and green is a historically appropriate choice. And we thought we'd decided. Then the electrician installed the temporary work lights, bright cool 5000K floods, and suddenly all three swatches looked wrong. Too blue. Too gray. Not at all what we'd seen in the paint store.
We didn't change the paint colors, as it turned out. We just held off on deciding until we had our actual fixtures installed with the actual bulbs. The color we'd liked in the first place turned out to be right. But we'd have been fine if we'd gone with the wrong one in the wrong light.
The practical rule: once you know your fixture types, buy one fixture and one bulb before you finalize your paint. Install them temporarily. Look at the paint swatches under that light. Then decide.
Choosing Fixtures for 10-Foot Ceilings: What the Scale Requires
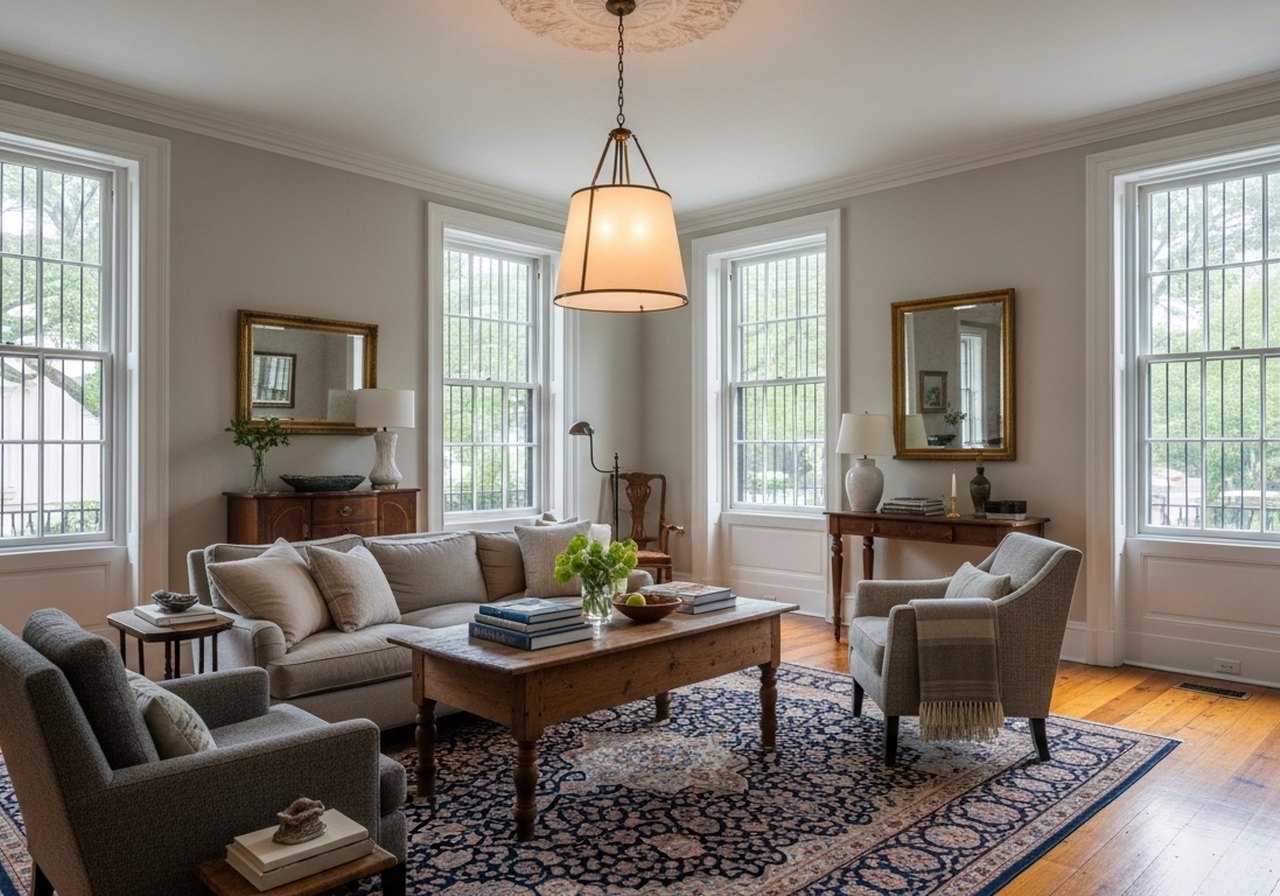
One of the most common mistakes I see in historic home renovations. And I see it constantly in before-and-after posts, is fixtures that are too small for the room. A fixture that would be generous in an 8-foot-ceiling tract house looks like a lost button in a room with 10-foot ceilings and 9-inch crown molding.
The standard rule of thumb for chandelier sizing, add the room's length and width in feet, and that gives you the diameter in inches, is a good starting point. Our dining room is 14 by 16 feet, which suggests a 30-inch fixture. We went with a 32-inch aged brass chandelier, which reads as exactly right in the space. An inch or two of error at this scale is invisible. Going six inches undersized is not.
For rooms with 10-foot ceilings, I've written a full guide to the best light fixtures for 10-foot ceilings that covers the specific scale rules, fixture style options, and the measurements that matter. For high ceilings specifically, also see my post on lighting high ceilings in an old home, which covers the layering approach in more depth.
Color Temperature: The Decision That Defines the Mood
If there is one thing I wish someone had told me before we renovated, it's that bulb color temperature matters more than almost any other single decision. More than the fixture. More than the shade. The color temperature of your bulbs determines whether your home feels warm and alive or clinical and flat.
Color temperature is measured in Kelvin. Here's what the numbers mean in plain terms:
- 2200–2400K: Very warm, amber-toned, like candlelight. Romantic. Not practical for task lighting.
- 2700K: Warm white. This is what old incandescent bulbs were. This is what homes are supposed to feel like. This is what we use almost everywhere.
- 3000K: Slightly cooler, still warm. Good for kitchens where you need to see what you're doing.
- 4000K: Cool white. This is office lighting. This is what makes your home look like a dental office.
- 5000K+: Daylight. This is construction lighting. Do not put this in your home.
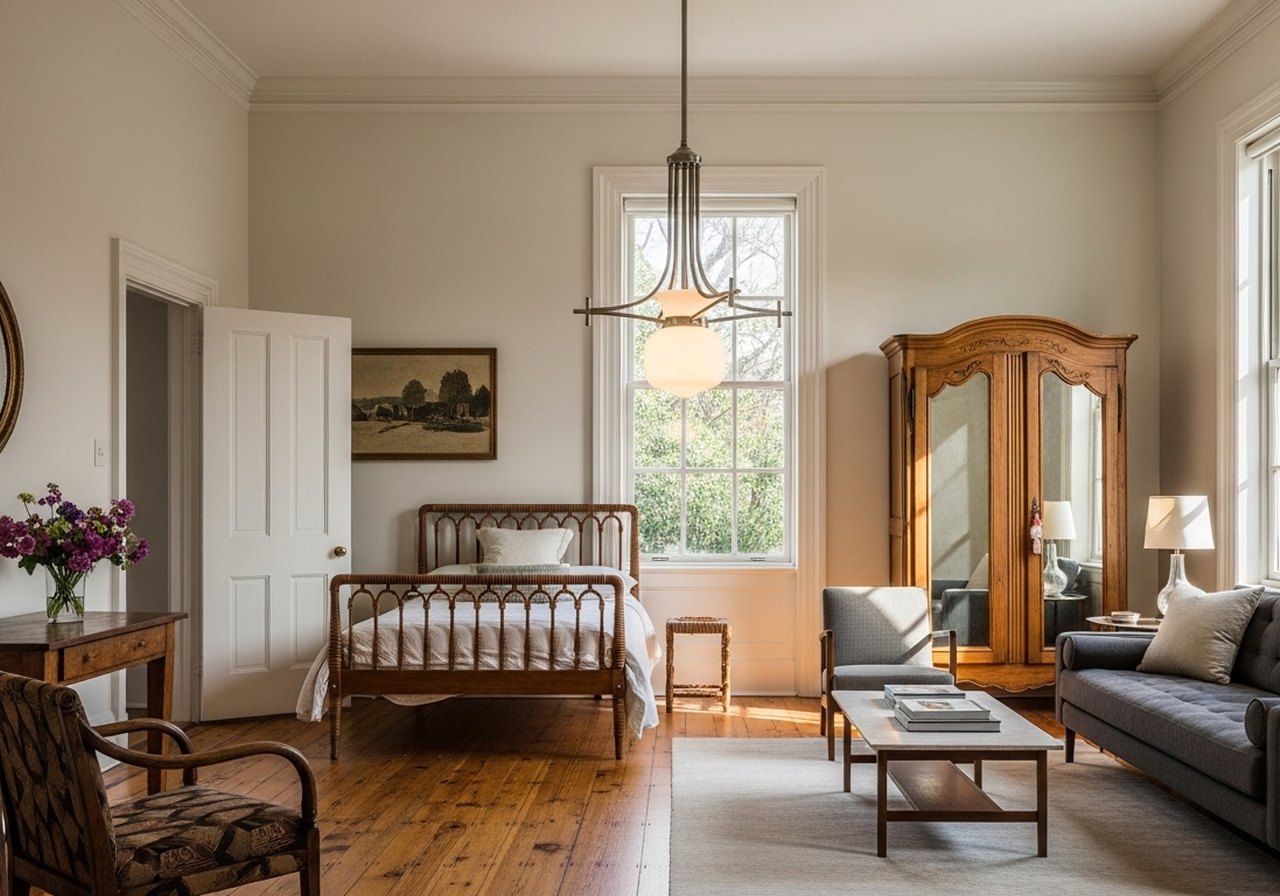
We use 2700K bulbs almost everywhere in the house. The only exceptions are the kitchen (where we went with 3000K for the under-cabinet lights so we can actually see the cutting board) and the laundry room (where we also went 3000K for visibility). Everything else. The dining room chandelier, the living room floor lamps, the bedroom fixtures, the hallway sconces, the front door lanterns, is 2700K.
The difference between 2700K and 4000K is not subtle. It's the difference between a room that feels like a home and a room that feels like a waiting area. The Department of Energy's LED lighting guide has good technical detail if you want to go deeper on the science, but the practical takeaway is simple: buy 2700K bulbs and don't deviate without a good reason.
Layered Lighting: Why One Source Is Never Enough
Professional interior designers talk about lighting in layers: ambient light (the general illumination of the room), task light (focused light for specific activities). And accent light (decorative or highlighting light). This framework exists because it's true. A room with only overhead light is flat and unappealing. A room with only lamps is cozy but often too dark for practical use. A room with all three layers feels alive and functional at the same time.
In our house, this meant:
Ambient lighting. We solved this in different ways in different rooms. In the dining room, the chandelier provides ambient light. In the living room, we deliberately have no overhead fixture; instead, four floor lamps on a dedicated wall-switch circuit provide the ambient light, which is both warmer and more flattering than ceiling light. In the hallway, wall sconces provide ambient light at a human scale.
Task lighting. The kitchen has under-cabinet lights that illuminate the countertops, which matters enormously when you're actually cooking. The reading chairs in the parlor each have floor lamps positioned over the left shoulder (right shoulder if you're left-handed, an important detail nobody mentions). The home office has a dedicated desk lamp separate from the overhead.
Accent lighting. This is the most optional layer, and we're still not done with it. We have picture lights over two pieces in the parlor. Eventually I want to add small directional fixtures to highlight the fireplace mantels in both main rooms. This layer is what makes a room feel designed rather than just furnished.
I write about the specific approach to layering in my post on how to layer lighting in a small room, which applies equally to larger rooms.
The Pendant Height Rules Nobody Tells You About
Once you've decided where fixtures go and what kind they are, you still have to decide how high they hang. This is where a lot of people just guess and then live with the consequences forever. Pendant height over a kitchen island, chandelier height over a dining table, sconce height in a hallway. Each has a logical answer that you can calculate, not guess.
The kitchen island rule: 30–36 inches from countertop to the bottom of the fixture. 32 inches is the sweet spot for most kitchens. We're at 31 inches in ours and it's right. See my full guide to pendant light height over a kitchen island for the complete calculation, including how multiple pendants change the math.
The dining room rule: chandelier bottom should hang 30–34 inches above the tabletop. For an 8-foot ceiling, the standard is 30 inches. For our 10-foot ceilings, we landed at 32 inches, which keeps the chandelier comfortably above sightlines while still feeling connected to the table. Higher than 34 inches and a chandelier starts to feel like it belongs in a different room.
The hallway sconce rule: center the sconce at 60–66 inches from the floor, roughly eye level for a standing adult. Lower than 60 and people hit it. Higher than 66 and it loses its intimate character and starts to feel like outdoor lighting that wandered inside.
What We Got Wrong (And Would Do Differently)
The question I get asked most often is: what did you get wrong? Here's the honest answer on lighting specifically.
We under-specified the living room. We planned for four floor lamps on a wall switch, which was the right idea. But we only ran two circuits, meaning all four lamps share two circuits, and we can't control the two halves of the room independently. I'd run four circuits next time, or at minimum add a second switch position on the other side of the room so you don't have to walk across the whole space to adjust the light.
We also underestimated how much we'd want dimmer control in the kitchen. We put dimmers on the overhead fixtures but not the under-cabinet lights, which turned out to be an annoying oversight. Those under-cabinet lights are bright enough to be intrusive in the evening when we don't need them at full strength.
And we waited too long to address the upstairs hallway. It's a narrow space with a skylight that floods it with light during the day but leaves it completely unlit at night. We eventually added sconces, but we did it as an afterthought, and the wiring required reopening one section of plaster wall that we'd already finished. It cost us an extra $800 and two weeks of scheduling the plaster restorer. If we'd planned it in the original rough-in, it would have cost maybe $150 in wire and a junction box.
The Summary, If You're About to Renovate
Before you pick a paint color, before you choose a sofa or refinish the floors, have a long conversation with your electrician about lighting. Walk every room. Ask where you'll want to sit and what activities will happen there. Plan the circuits, the switch positions, the fixture locations. Then choose your fixtures. Then install one fixture with its actual bulb and evaluate your paint swatches under that light. Then decide everything else.
This is not the conventional advice. The conventional advice is to start with a mood board and work out from there. But in a historic home, in a house built in an era when artificial light was an afterthought. The bones were designed around natural light, and you have to plan your artificial light with equal intentionality. Start there. Everything else will follow.
Lighting posts on this site: I've written guides on chandelier height for dining rooms, hallway sconce placement, fixtures for 10-foot ceilings, lighting high ceilings, choosing a statement pendant, and lighting a small historic bedroom. Each one goes deeper on the specific topic than this overview can.
Quick Answers
Should I choose lighting or paint color first when renovating?
Choose lighting first, specifically, decide on your fixture types and bulb color temperature before finalizing paint colors. The same paint color can look noticeably different under 2700K warm white versus 4000K cool white light. Evaluate paint swatches under your actual installed fixture and bulb before committing.
What color temperature bulbs should I use in a historic home?
2700K warm white for almost every room. This matches the look of old incandescent bulbs and creates the warm, residential feel that historic homes are meant to have. Reserve 3000K for kitchens and utility spaces where visibility matters more than ambiance. Never use 4000K or higher in living areas. It reads as institutional.
How much does it cost to plan lighting correctly before closing the walls?
The planning conversation with your electrician is usually part of the bid and costs nothing separately. The electrical rough-in cost varies by scope, for our 2,200-square-foot house with about 40 fixture locations and full circuit planning, rough-in ran approximately $11,000. Getting it right the first time saves the cost of reopening plaster walls, which runs $85–$120/hour for a skilled plaster restorer, plus the electrician's time to add or move junction boxes.
BO-HA's lighting collection was our starting point for both the dining room pendant and the living room sconces, broad enough to compare styles before committing to a direction.
Dana at Light and Linen wrote about her slow home lighting philosophy, a different approach than our budget-first method, but her thinking about sequence is worth reading.
Why Lighting Comes Before Paint
It's tempting to start a renovation with paint or furniture, but light changes how every one of those choices reads. The same wall color looks completely different under a cool builder bulb and a warm 2700K one. And a beautiful room lit by a single harsh fixture still feels flat. Sorting the lighting first means every later decision is made under the light you'll actually live with. The ENERGY STAR bulb guide is a good primer on the numbers if you want to understand color temperature before you start swapping.
A Room-by-Room Order of Operations
I work outward from the rooms we use most at night. Living and dining rooms first, because that's where we spend evenings and host; then the kitchen, where task light genuinely matters; then bedrooms, then the in-between spaces. In each room I build the same three layers, a warm overhead on a dimmer, eye-level light from sconces, and a lamp or two, rather than relying on the single ceiling fixture the house came with. Doing one room at a time keeps the budget sane and lets each space teach you what it needs.
Shop this post: lighting collection